
Many companies have set up—or have previously set up—report bursting using other BI tools. The goal was often to distribute reports in various formats within their own organization, as well as to external organizations. In this blog post, we’ll take a look at the options for report bursting with PowerBI.com reports.
What is report bursting?
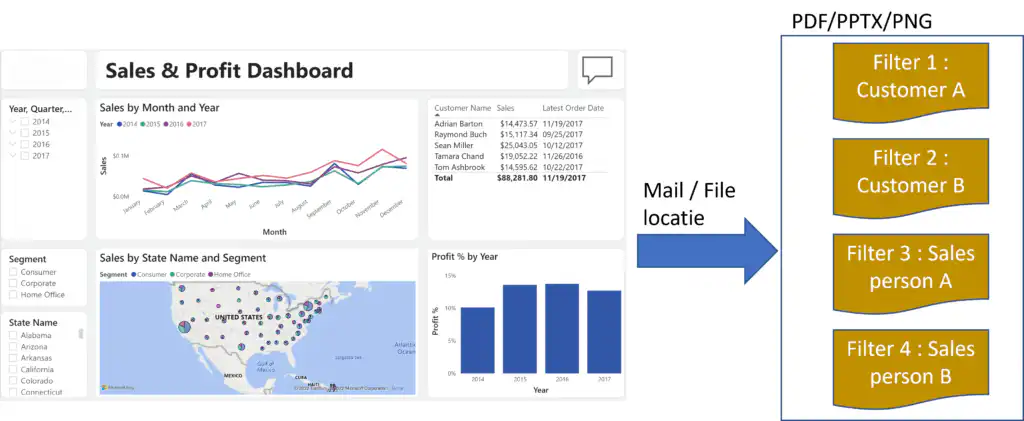
What does report bursting do again? With report bursting, you can schedule a report and, using a single schedule, send different filtered versions of the same report to different users and/or save them to a file location.
Microsoft Power Automate
To set up Power BI report bursting, use Microsoft Power Automate. You can sign in via the link https://emea.flow.microsoft.com/ with your Office 365 account.
In summary, a bursting flow might look like this:
In this case, different filtered versions of the same Power BI report are sent to different email recipients and are also saved to a SharePoint Online location. Of course, you can also choose to send only via email or save only to a SharePoint location, or you can even link an SFTP action to the process.
How It Works in Detail
Recurrence
When defining a new Cloud flow, you specify the schedule interval. This can be once a month, once a week, once a day, etc.
Input table for report bursting
This is an important step, because here you define which objects or filters a report will use to “break down” the data. In this case, the input table is an Excel file defined as a table and saved in SharePoint Online so that it can be accessed from Power Automate.
Use the Workspace ID and Report_ID columns to specify which Power BI report you are referring to. You can find these IDs in the URL when you open the report in question.
In the “Filter” column, I’ve included the syntax I want to use to filter or break down the various reports. You can find more options regarding syntax here: https://docs.microsoft.com/nl-nl/power-automate/use-expressions-in-conditions
An easy way to check the syntax is to append the filter to the end of the report URL. For example, append the following to a report URL: “ ?filter=Zip Codes/State Name eq ‘Arizona’ ” and check whether the filter in question is applied when requesting the report.
“Apply to All” control”
This process iterates through all rows (records) in the input table above. In my example, 7 versions of the report are sent and saved to a SharePoint location.
Export to File for Power BI Reports
Enter the name of the Power BI report here. I'm referring to my Excel columns in the input file. You can also simply type the relevant IDs here.
Send Email and/or Export to SharePoint Online
The steps above are the final ones in the process, where it is helpful to dynamically assign the fields that need to be filled in based on the columns in the input file.
Next Steps
The Cloud stream can be tested. This is especially useful when the process includes a step for sending email, because during testing, all emails are first sent to your own email address.
In addition, the Cloud stream can be shared with others, which is useful when you're on vacation, sick, etc. You can also manage all Cloud streams in the Power Automate portal, and you'll receive an email if the Cloud stream unexpectedly encounters an error.
Export to Other Formats
A Power BI report can only be exported to a limited number of formats (PDF, PPTX, and PNG). If you also want to export to other formats, such as CSV or Excel, you’ll need to create a report in Power BI Report Builder. In Power Automate, you can then use the “Export to File for Paginated Reports” Use this. The rest of the steps are then similar to those described above.
Required Licenses
Unfortunately, the combination of Power BI and Power Automate currently works only with a Power BI Premium per-capacity license. This is likely because you’ve already purchased all the licenses for your organization, and it no longer matters to Microsoft that reports are made available to users via a “workaround.”.
Alternative
If you have a Power BI license, you can subscribe on PowerBI.com (or someone else can do this for you using Azure AD groups) to a report that is sent periodically. By default, the entire contents of a report are sent, but it’s also possible to set up Row Level Security in, for example, the Tabular Model or a Power BI dataset. When the report is opened and/or sent, it is then automatically filtered based on the Row Level Security rule that applies to the user in question.
Conclusion
Report bursting for Power BI reports using Power Automate is a great feature, but unfortunately it’s only available with a more expensive Power BI Premium per-capacity license. Depending on how important report bursting is, the total number of Power BI users, and whether there are obligations to external organizations, this is worth considering. An alternative for smaller organizations could be to provide a Power BI account to everyone within the organization who needs to generate reports and to use Row Level Security to ensure that individuals see only the correct, filtered information.