If you use smart heating devices like those from Tado° in the office, you can heat the different rooms as desired—either according to a schedule or manually via the app. The schedules don’t account for flexible usage. Especially in office environments, this often means that heaters stay on or run on days when no one is there.
With higher gas prices and environmental taxes, we can make this even smarter by using Power Automate and Microsoft Outlook—and, at the same time, we can ensure that employees let us know whether they’re coming into the office.
Our office, a former coach house in Sparrendaal, is beautiful, but being several centuries old, it’s not exactly energy-efficient. During the winter months, we need a lot of gas to maintain a comfortable temperature. Since gas prices have risen, we’ve been looking for ways to use less gas while maintaining the same level of comfort.
We installed meters to track energy usage and a Tado thermostat to make it easier to control the temperature—both the central temperature and the temperatures in individual rooms. Although Tado is much more user-friendly than a wall-mounted thermostat, we thought we could make things even more convenient by linking our calendars to the thermostat. This way, everyone at Ensior can control the temperature, and with our current hybrid work model, we can also better let each other know when we’re in the office and when we’re not.
In this blog post, Geoffrey Rosheuvel describes the steps needed to make this possible.
What do you need?
- Smart Thermostat V3+ and one or more smart radiator valves
- An associated user account (for the Tado° app)
Microsoft 365/Exchange Online environment
- Account with a Microsoft 365 E3/E5 user license
- Outlook 365
- Access Microsoft 365 Admin Center or Exchange Admin Center (ask the admin)
- With Premium Flows support
- Free 90-day per-user trial available
- Then, a pay-as-you-go or per-user plan
- To test or debug API calls
- Postman sample collection with API calls
- Two Power Automate flows
How does it work?
As an employee, all you really have to do is schedule an appointment with a specified location in your Outlook calendar; Power Automate and Tado° take care of the rest.
- You create an appointment in your Outlook 365 Calendar and specify the location as an office space (with a smart radiator).
- Within a few minutes, you'll receive an email confirmation from Power Automate Flow 1. The notification will indicate whether the scheduled appointment meets the conditions for turning on the heat
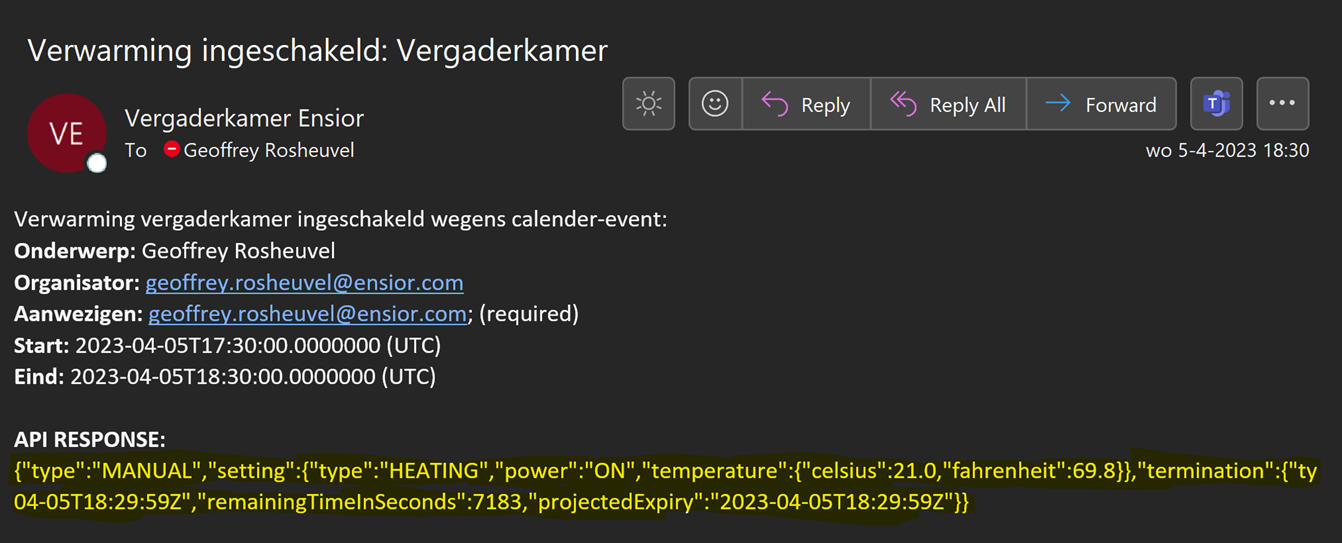
- As soon as the appointment is about to start, you'll receive an email confirmation from Power Automate flow 2. This flow automatically turns on the heat by calling the Tado° API and specifies the desired heating duration and temperature
- As soon as the scheduled event ends, Tado° will revert to your regular heating schedule.
Configuration of Parts
Tado
To control the heating, you’ll need the smart thermostat. If you want to heat individual rooms, each room must be equipped with at least one smart radiator valve. In our example, the smart thermostat is installed in the lobby, and the conference room is equipped with two smart radiator valves. You can see this on app.tado.com. The app communicates with the thermostat via an Application Programming Interface, the Tado° API.
Be sure to create a separate login (the “service account”) for automating the heating system. It’s always a good idea to assign a dedicated account to such automations and not to use your personal account for this purpose. If this service account gets blocked due to an error, or if the associated login credentials are accidentally shared in tools like Power Automate, you can easily block or delete the account without locking yourself out.
Write down the email address and password for the service account; we'll use them to test the connection to the Tado° API.
Postman
A commonly used tool for testing APIs is Postman. The tool allows you to send requests to the API and receive responses. In Postman, you can create, test, and export a collection of these “API calls,” and then import them into Power Automate as a “custom connector,” provided they meet certain technical requirements.
Unfortunately, this is not yet possible for the Tado° API at the time of writing, because that specific authentication type is not supported. Therefore, we will manually define the API calls that we will test in Postman within Power Automate.
You can import our sample collection—which contains the API calls we’ll be using in Power Automate—by adding the file “TadoBlogEdit.postman_collection.json” to the template files (download link at the top). In Postman, you can then adjust a few parameters so that it works with the Tado° service account you created earlier. The collection is based on A blog post by Stephen C. Philips from 2017; Tado° has not published any official or public API documentation. Please keep in mind that unexpected changes may be made, which could cause the automation to stop working.
Once you've imported the collection, you can use Postman to follow these steps to test the API and retrieve the necessary parameters for Power Automate. !– –>
Retrieve access token
The first call is to request a token. This is done using the OAuth2 protocol for authenticating and authorizing the application and the user. The following parameters are required:
client_id:tado-web-app
client_secret:wZaRN7rpjn3FoNyF5IFuxg9uMzYJcvOoQ8QWiIqS3hfk6gLhVlG57j5YNoZL2Rtc
grant_type:password
scope:home.user
username:automatisering@uwdomein.nl
password:Password123#
The “client_id” and “client_secret” are the general identifiers for the Tado web app; in this case, the API uses them to recognize that the call is coming from the web app. The username and password are specific identifiers for the Tado° user; update these to match those of the service account you created earlier.
As soon as you click “Send,” the call is sent, and you’ll see the response with a token at the bottom:
In this case, we only need the “access_token.” The response indicates that it is valid for 599 seconds and expires after that; this is more than enough time to run the Power Automate flow. The access_token is temporarily stored in the Postman collection and used for the subsequent calls.
Get Home ID
Answer:
The “HomeID,” which is 1234567 here, is also temporarily stored for use in the following calls. Be sure to note this number along with the login credentials for the service account you created earlier; we’ll need it later in Power Automate.
Retrieve ZoneIDs
Answer (abridged):
Here we can find the various rooms and Tado° devices. In our example, we want to control the conference room, so we'll note down zone ID 2.
Set Zone Temperature
You can then set the temperature using a PUT request. In this example, you specify in the URL that you are setting the temperature for zone 1, and in the “request body,” you specify the temperature and duration parameters. We’ll adjust these three parameters as needed in a subsequent step in Power Automate.
Answer:
After sending the request, the response confirms the setting; please note that the timestamps are displayed in UTC and not in local time.
Office Locations
To use office locations in Outlook, the rooms (with a smart radiator button) must be recognized in your Active Directory. If this isn’t yet the case at your office, you can create them in the Microsoft 365 or Exchange admin portal. You’ll need administrator rights to configure them. If you don’t have those rights or aren’t familiar with this process, it’s best to have an IT administrator do this for you or work with them to complete the task.
(see Room and Equipment Mailboxes – Microsoft 365 Admin | Microsoft Learn (For more information.).
In this example, we'll add our gym as an office location.
When creating the resource, consider how the spaces can be booked and by whom, and what impact this might have on turning on the heat. For a boardroom, it might make sense that it can only be reserved by one person at a time during a specific time slot, and that the reservation must first be approved by someone. The general office space, on the other hand, can be booked by multiple employees at the same time (double booking) without requiring approval.
Of course, you also don't want the heat to be left on unnecessarily due to an incorrect booking, so make sure to minimize that risk both in the booking options and in the Power Automate logic in the subsequent steps.
To create flows in Power Automate that respond to events from a resource calendar, the person creating the flow needs full access to the created resources. With this access, the calendar can be read (the trigger), and a notification email can be sent on behalf of the resource. To do this, add the user account to the “Send as,” “Send on behalf,” and “Read and manage” permissions in the Delegation tab.
Power Automate
In Power Automate, we’ll create two automated flows. You can import the flows we use and customize them as desired; the two ZIP files are in the template files (download link at the top). The first flow is optional; it sends an email notification that an event has been scheduled and whether or not it will turn the heating on. This notification appears within a few minutes after someone has scheduled the event in their calendar. In the flow’s actions, you’ll need to adjust a few parameters so that it works with your Tado° setup: the “Calendar ID” in the “event is created” action and the corresponding email address in “initialize resource-email address.”.
The second flow is triggered as soon as an event is about to begin and turns on the heating if the condition is met. Here, too, you adjust a few parameters: the same ones from the previous flow, plus the remaining “initialize” variable actions. Enter the values you used or retrieved with Postman, the Tado° service account credentials, the “zoneID,” “homeID,” and the desired temperature.
Conclusion
Using familiar Microsoft tools (Outlook and Power Automate), we’ve made it possible for all colleagues to adjust the temperature in our office and some of its rooms. An added benefit is that we’re better able to keep each other informed when we’re in the office.
Our gas consumption has dropped by more than 30%, without us having to lower the temperature.
It's great that we were able to achieve this using the same tools we use in our professional work. If you have any questions regarding this blog, Contact us.